
Studio App · kostenlos für iOS und Android
Die Studio App
Kurse buchen, Mitgliedschaft verwalten, nichts verpassen
Überblick
Was die Studio App ist – und was nicht
Unsere Studio App ist die App, über die bei uns alles Organisatorische läuft: Du siehst den kompletten Kursplan in Echtzeit, buchst Kurse und Privattrainings, schließt Deine Mitgliedschaft ab, hinterlegst Deine Zahlungsdaten und bekommst eine Nachricht, wenn sich etwas ändert. Ohne App geht es auch – aber Du läufst dann jeder Information hinterher.
Technisch steckt dahinter die Software Glofox. Im App Store und bei Google Play suchst Du deshalb nach „Glofox“ und wählst darin unser Studio aus. Auf manchen Geräten heißt die App inzwischen ABC Glofox – das ist dieselbe App. Finger weg von „Glofox Pro“: Das ist die Trainer-App und für Dich nutzlos.
Die Einrichtung dauert einmalig etwa zehn Minuten, weil dabei auch AGB und Haftungsausschluss digital unterschrieben werden. Danach ist Buchen eine Sache von zwei Tipps. Diese Seite führt Dich Schritt für Schritt durch, mit einem Screenshot pro Schritt.
Preis
kostenlos
Plattform
iOS & Android
Einrichtung
ca. 10 Minuten
Für Kinder
Familienkonten möglich
Schritt 1
App laden und Studio auswählen
Zwei Handgriffe. Wichtig ist nur, dass Du die richtige App erwischst und danach unser Studio auswählst – sonst siehst Du fremde Kurspläne.

Schritt 1
App laden
Öffne den App Store (iPhone) oder Google Play (Android) und suche nach Glofox – nicht nach „Glofox Pro“, das ist die Trainer-App. Auf neueren Geräten läuft sie unter ABC Glofox. Oder nimm einfach einen der beiden Buttons hier drüber.
Schritt 2
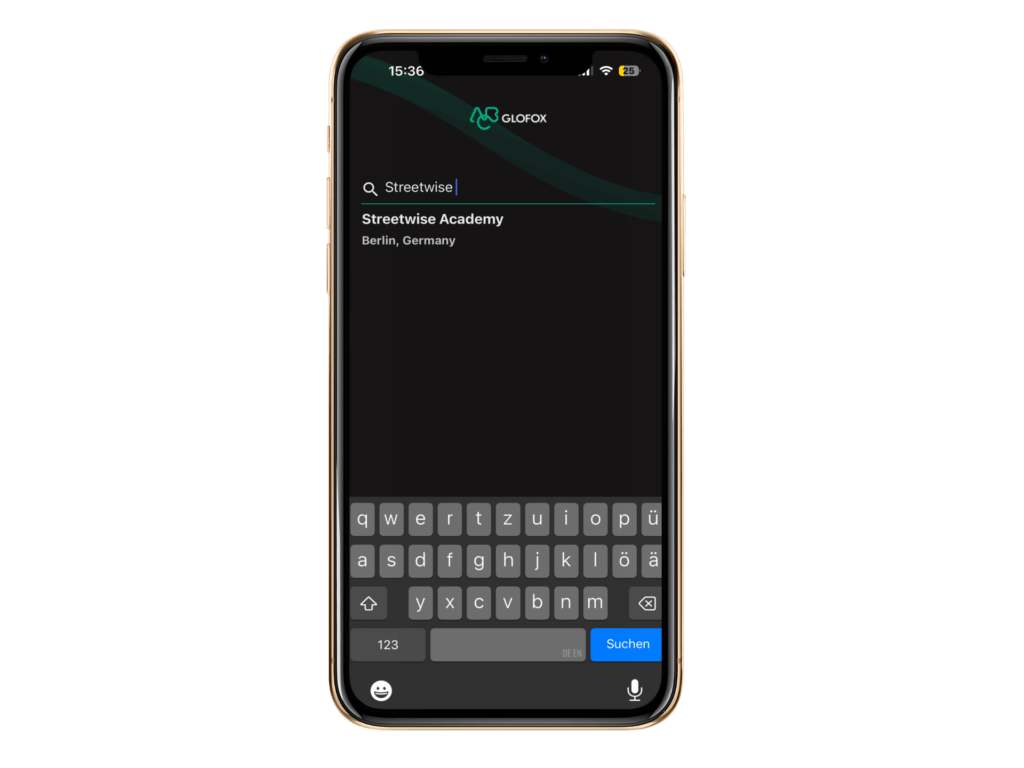
Streetwise Academy suchen
Starte die App und suche nach Streetwise Academy. Wähle den Eintrag aus. Ab jetzt siehst Du ausschließlich unsere Kurse, Termine und Preise.
Schritt 2
Registrieren und einrichten
Das ist der längste Teil, aber Du machst ihn genau einmal. Wenn wir Dir vorab schon ein Konto angelegt haben – Du hast dann eine SMS oder E-Mail von uns bekommen – registriere Dich nicht neu, sondern hol Dir Dein Passwort über „Passwort vergessen“.
Schritt 3
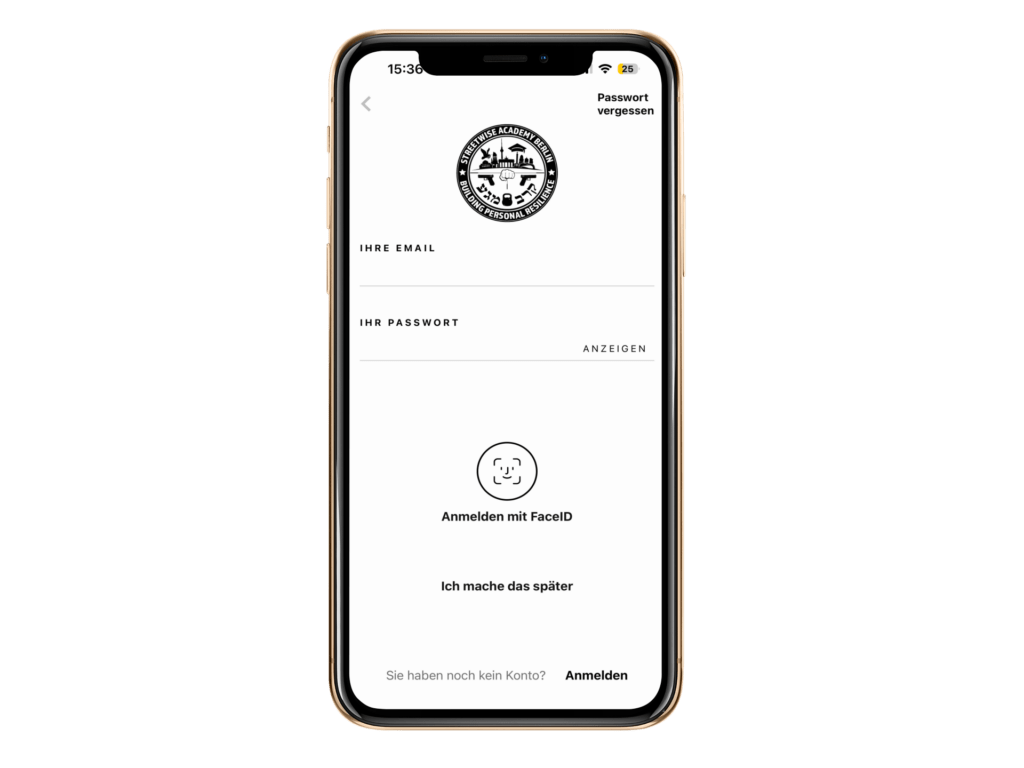
Registrieren
Neu bei uns? Tippe unten rechts auf ANMELDEN und folge den Anweisungen. Hast Du schon ein von uns angelegtes Konto, nutze stattdessen „Passwort vergessen“ oben rechts.
Schritt 4
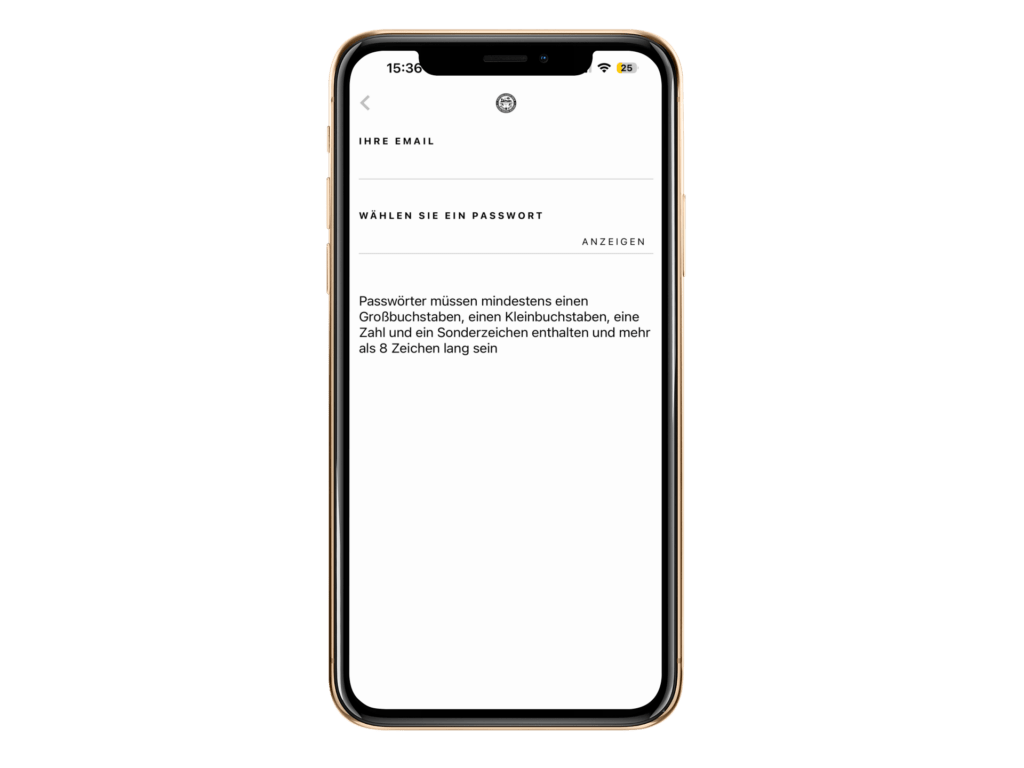
Anmeldedaten
Dein Konto wird über Deine E-Mail-Adresse eindeutig identifiziert. Vergib ein sicheres Passwort: Mindestens acht Zeichen, dazu Groß- und Kleinbuchstabe, Ziffer und Sonderzeichen.
Schritt 5
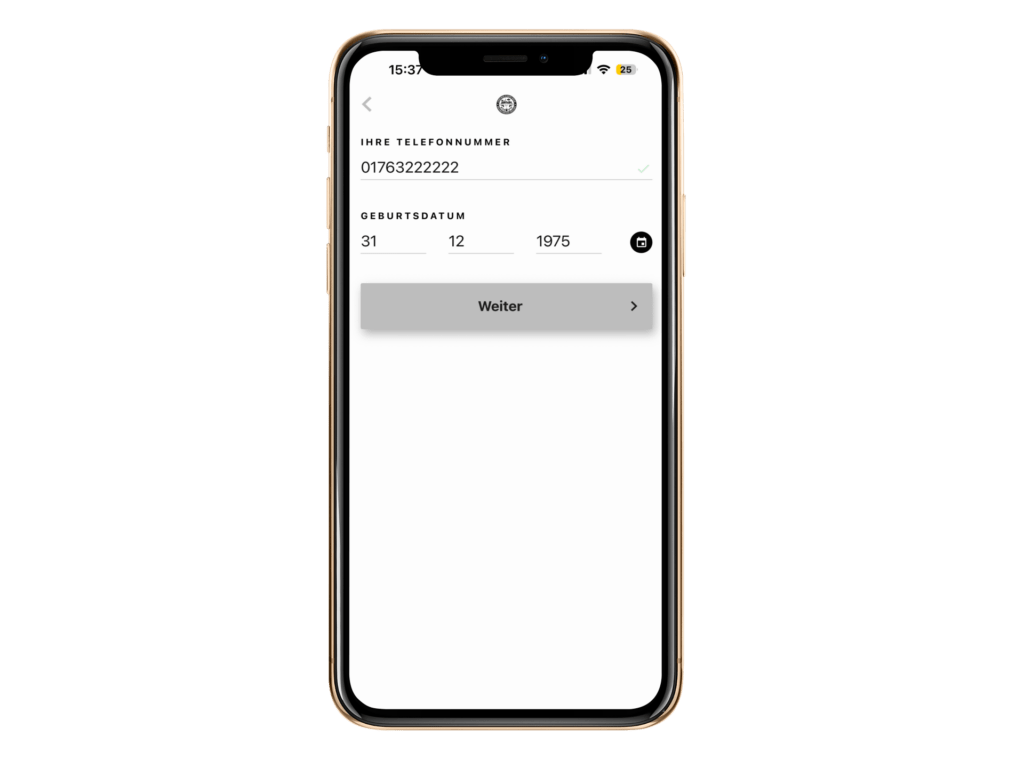
Handy & Geburtsdatum
Trage Deine Handynummer und Dein Geburtsdatum ein. Das Geburtsdatum brauchen wir, weil einige Kurse an Altersgruppen gebunden sind.
Schritt 6
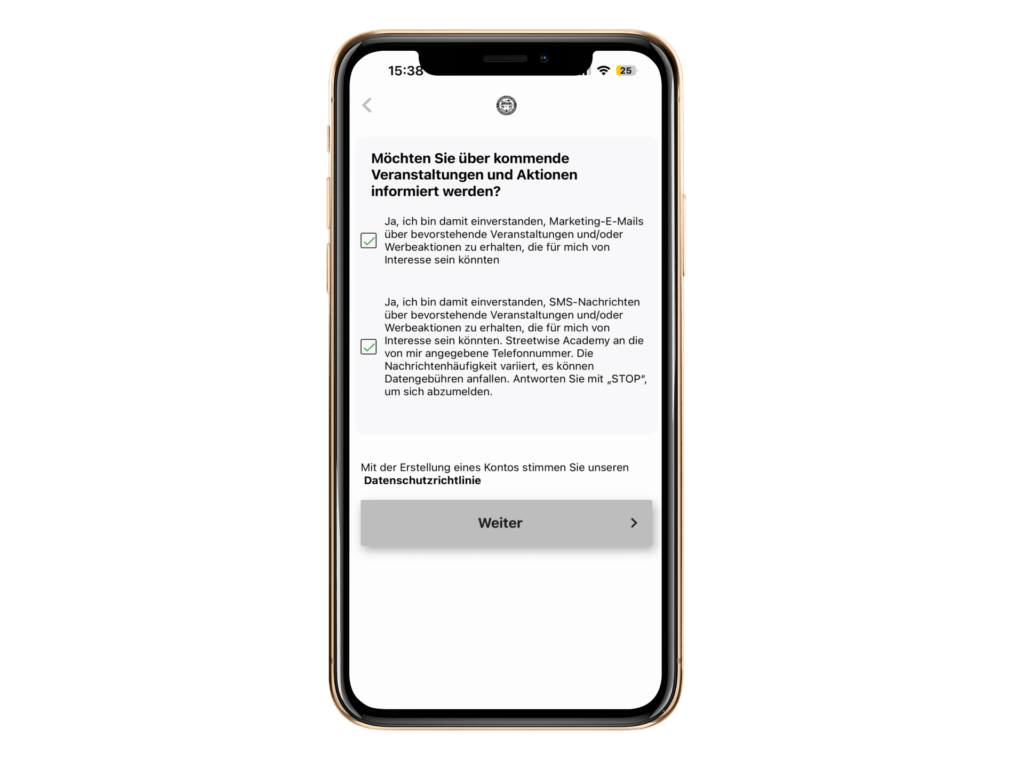
Benachrichtigungen
Setze beide Haken. Nur so erfährst Du von Änderungen im Kursplan, von Kursausfällen und von Erinnerungen an Deine gebuchten Termine.
AGB und Haftungsausschluss unterschreiben 5 Schritte · einmalig
Schritt 7
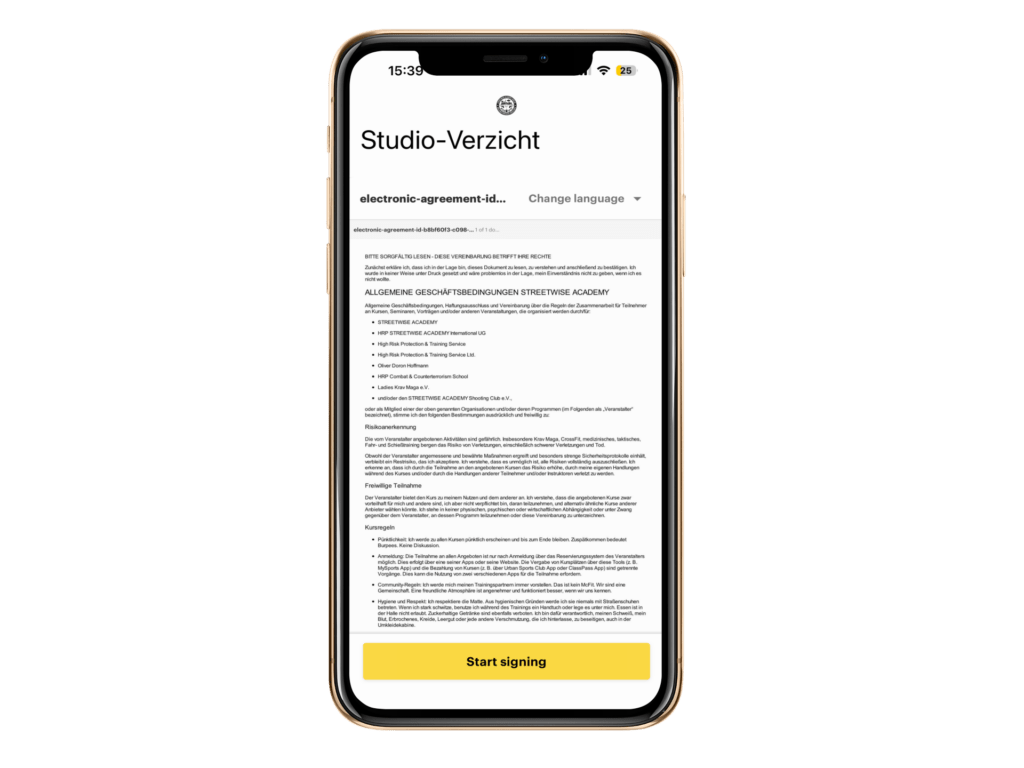
Dokument öffnen
Jetzt unterschreibst Du AGB und Haftungsausschluss digital. Das Dokument braucht manchmal ein paar Sekunden zum Laden – nicht mehrfach tippen. Scrolle ganz nach unten und tippe auf START SIGNING.
Schritt 8
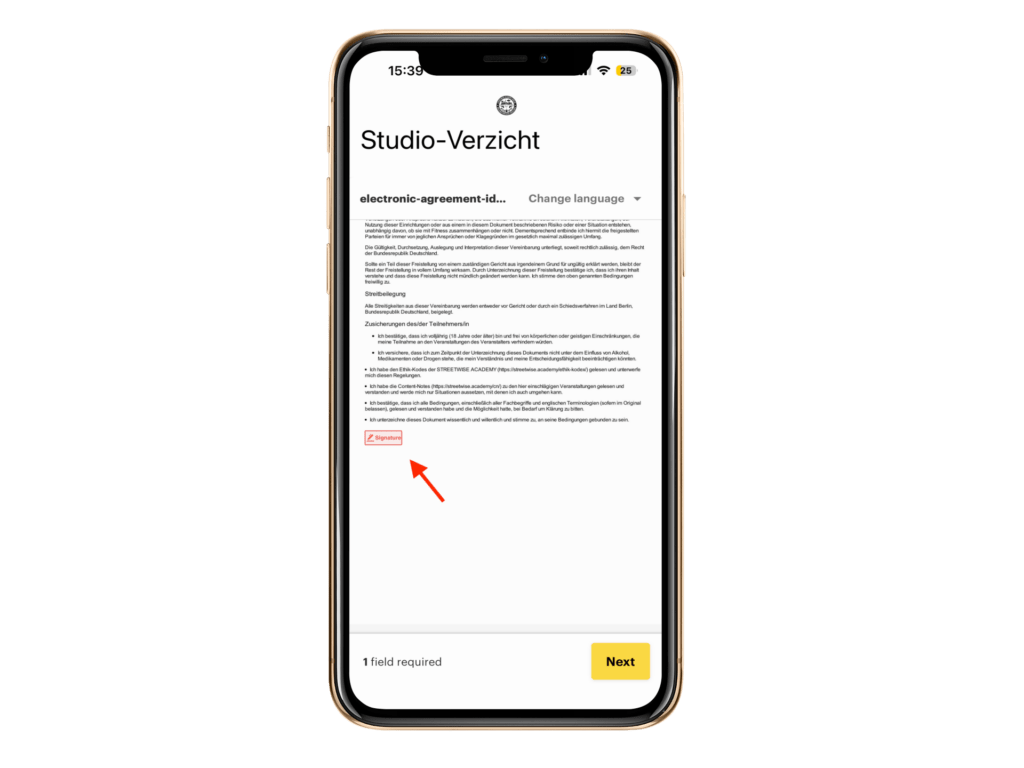
Unterschriftsfeld
Tippe auf den rot markierten Bereich SIGNATURE. Es öffnet sich ein neuer Screen.
Schritt 9
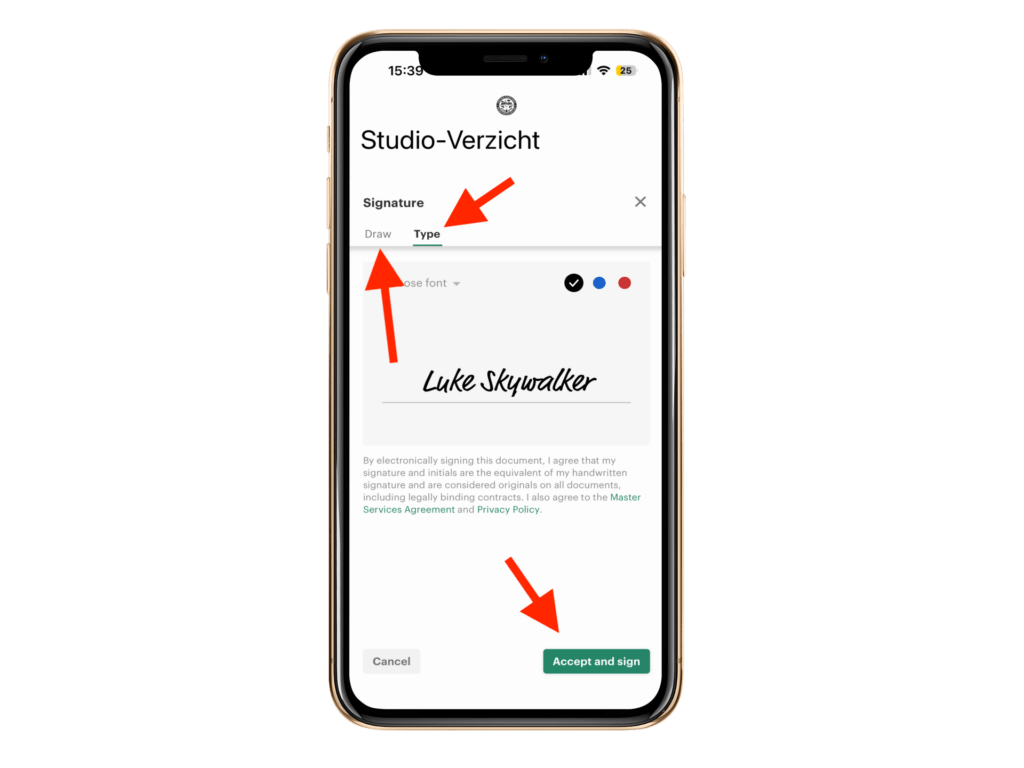
Tippen oder zeichnen
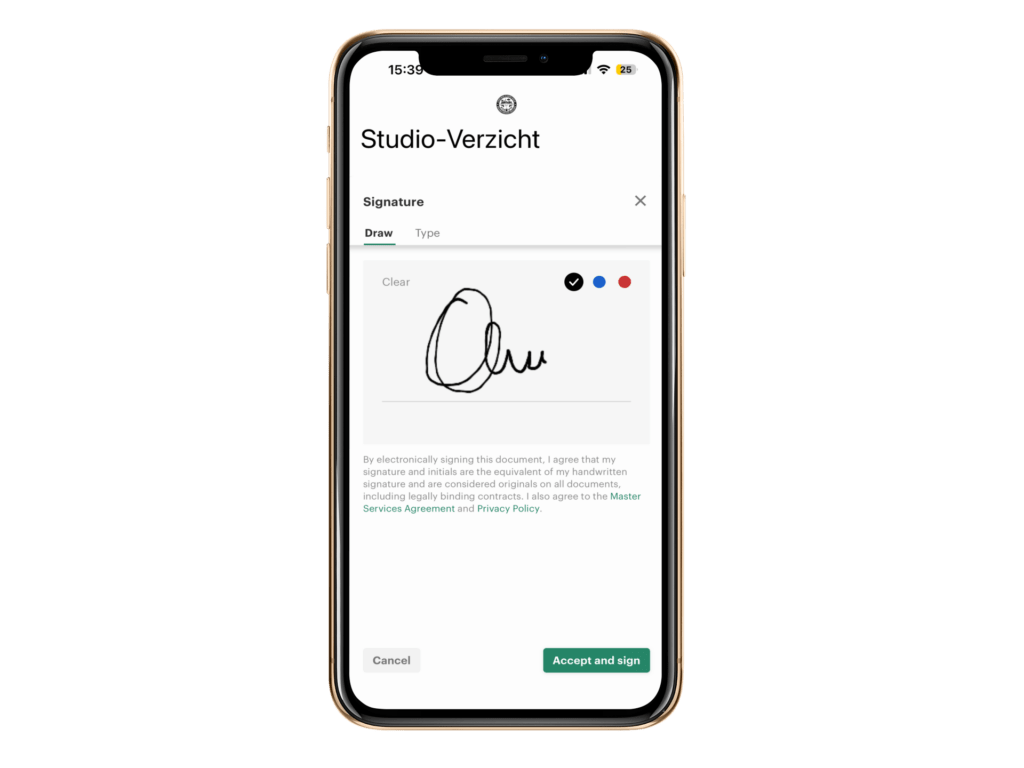
Wähle oben links, ob Du selbst mit dem Finger unterschreiben (DRAW) oder Deinen Namen tippen möchtest. Reicht Dir der getippte Name, bestätige direkt mit ACCEPT & SIGN.
Schritt 10
Selbst unterschreiben
Bei DRAW unterschreibst Du mit dem Finger auf dem Display und bestätigst unten rechts mit ACCEPT & SIGN.
Schritt 11
Abschließen
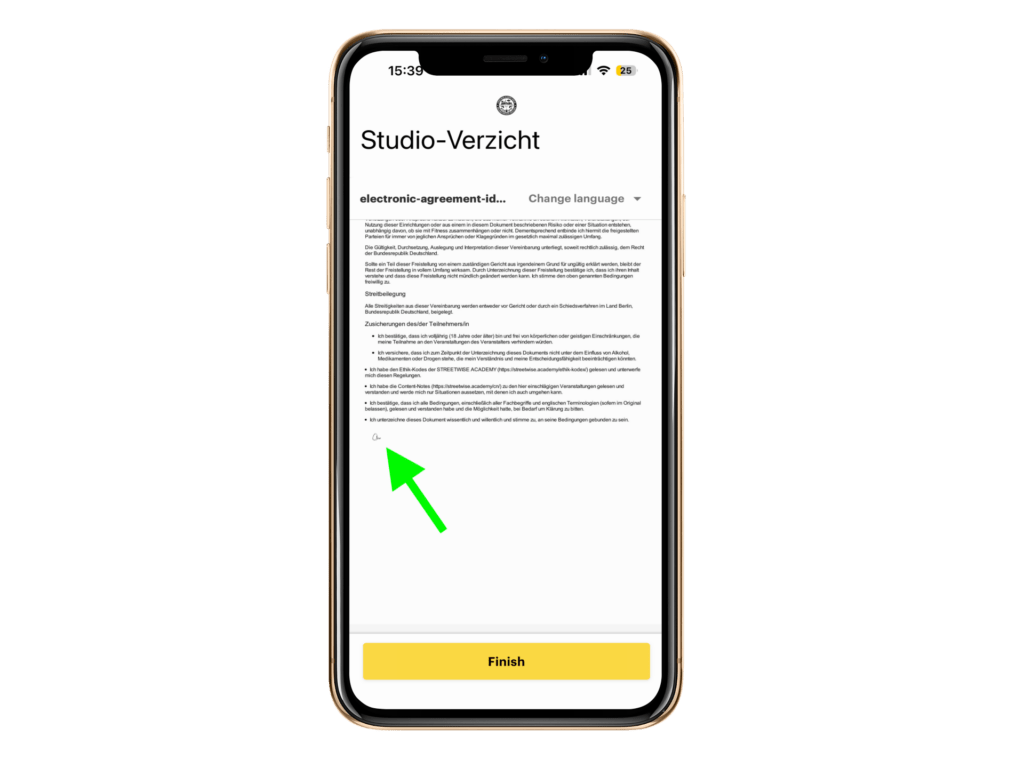
Du siehst das unterschriebene Dokument. Tippe auf FINISH, um den Vorgang zu beenden.
Schritt 12
Konto steht
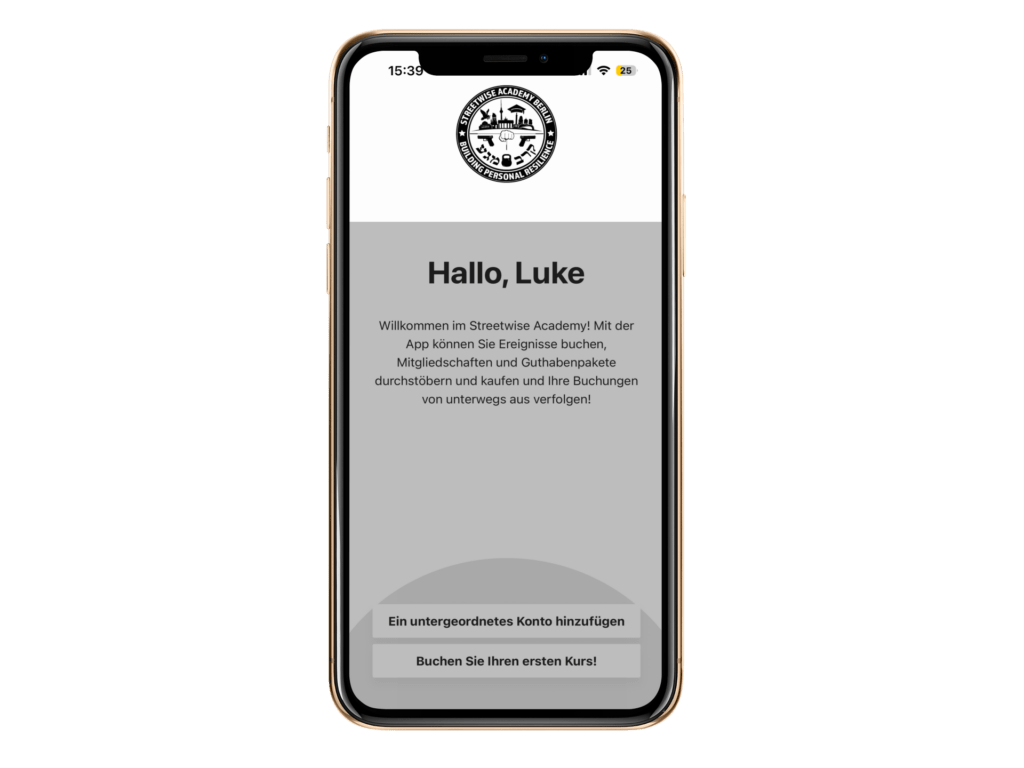
Fertig, Dein Konto ist erstellt. Jetzt entscheidest Du, ob Du eine Mitgliedschaft abschließt und Kurse buchst – oder zuerst ein Familienkonto für ein minderjähriges Familienmitglied anlegst.
Profil vervollständigen und Zahlungsmethode hinterlegen 4 Schritte · empfohlen
Schritt 13
Profil öffnen
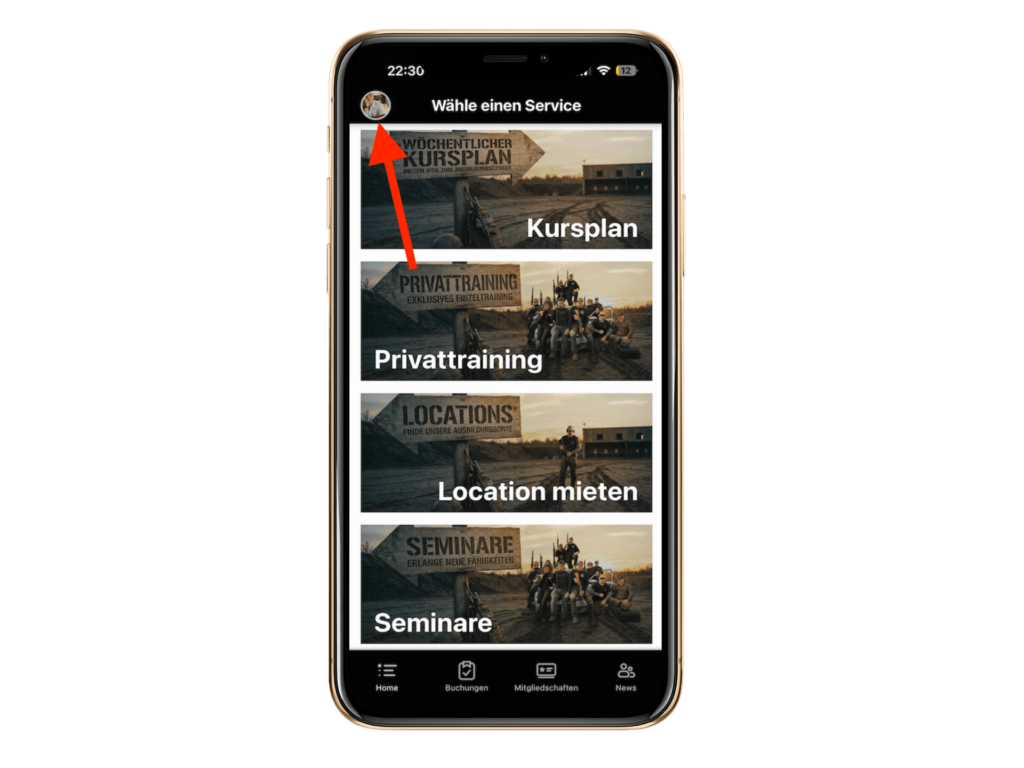
Tippe oben links auf das runde Symbol – anfangs noch ohne Foto –, um Deine Daten zu vervollständigen.
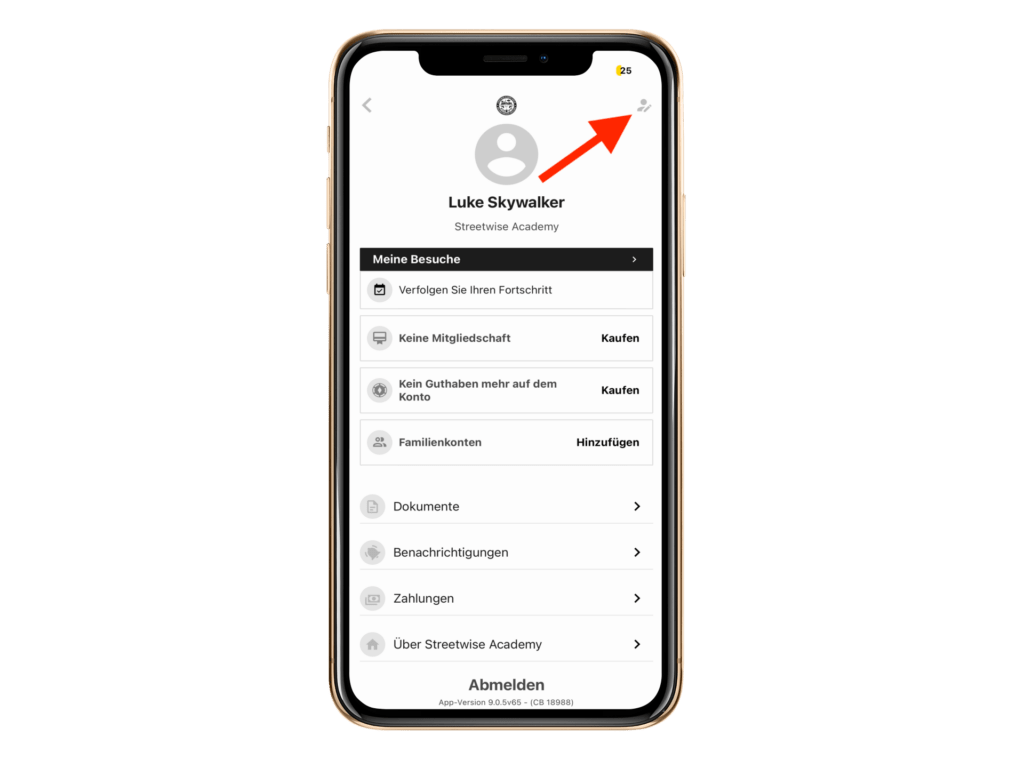
Schritt 14
Profilbild
Du siehst jetzt Dein Konto. Oben rechts legst Du ein Profilbild fest. Das hilft den Trainer:innen, Dich im Kurs zuzuordnen.
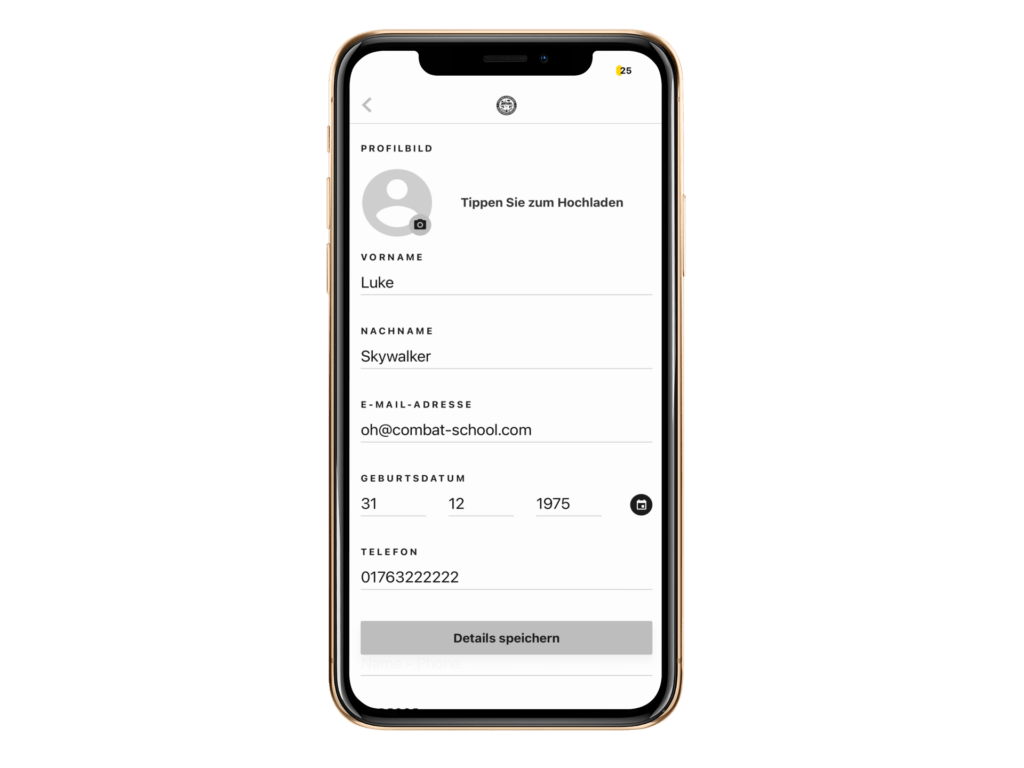
Schritt 15
Adresse & Notfallkontakt
Weiter unten trägst Du Deine Adresse und einen Notfallkontakt ein. Den Notfallkontakt brauchen wir wirklich – bitte ausfüllen.
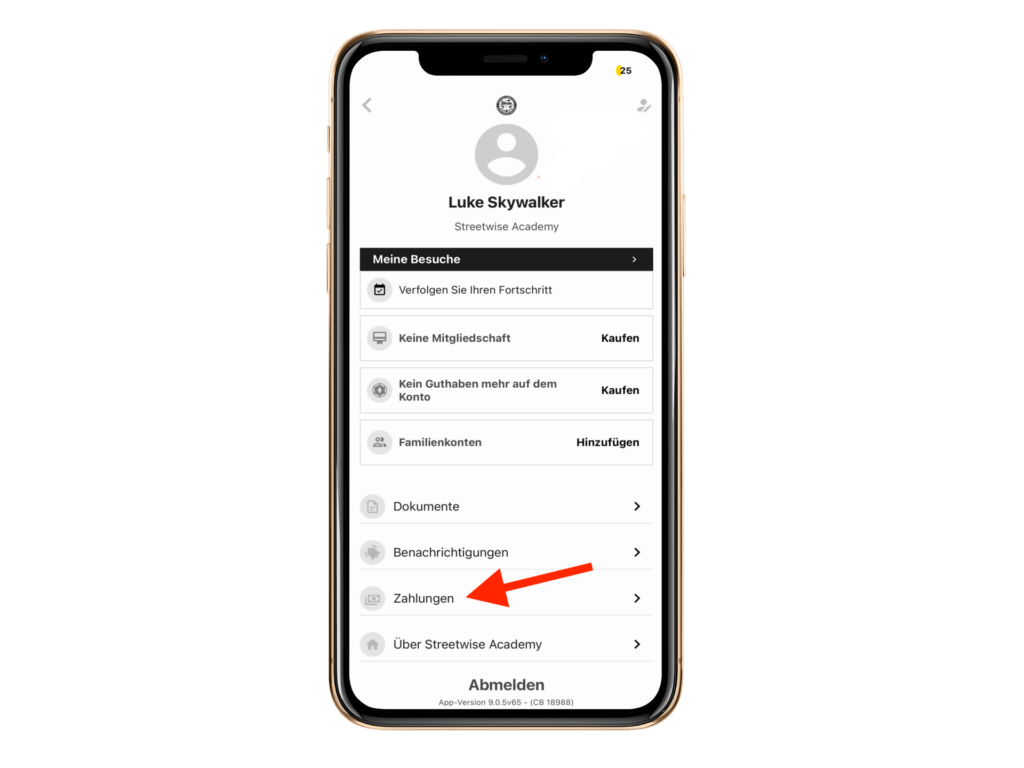
Schritt 16
Zahlungsmethode
Hinterlege eine oder mehrere Zahlungsmethoden: Kreditkarte, Lastschrift und in Kürze auch Apple Pay und Google Pay.
Schritt 3
Loslegen – was Du in der App machst
Ab hier wird es einfach. Das ist der Alltag mit der App, und dafür brauchst Du keine Anleitung mehr.
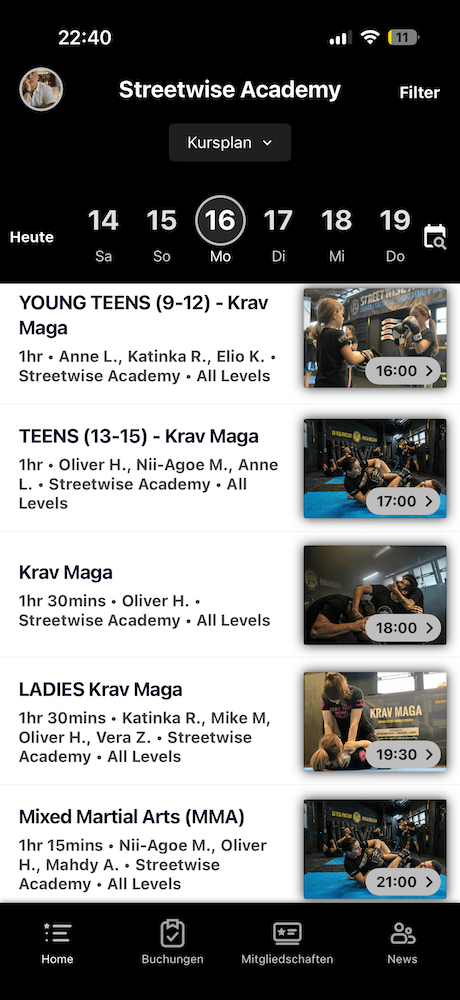
Kursplan & Buchen
Der komplette Kursplan der Woche mit Uhrzeit, Trainer:in und freien Plätzen. Ein Tipp auf den Kurs, ein Tipp auf Buchen – fertig. Absagen geht genauso schnell.
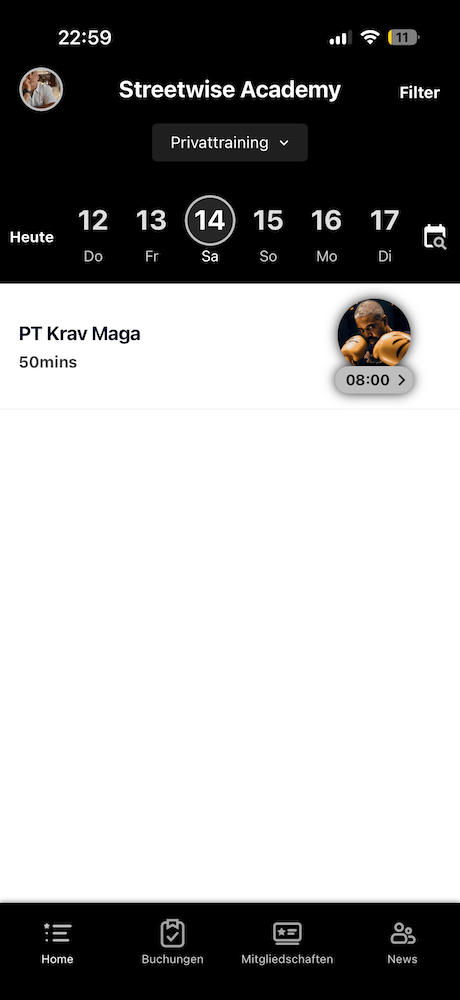
Privattraining
Privattrainings buchst Du direkt beim jeweiligen Trainer oder der jeweiligen Trainerin, mit den tatsächlich freien Zeiten. Kein Hin und Her per Nachricht.
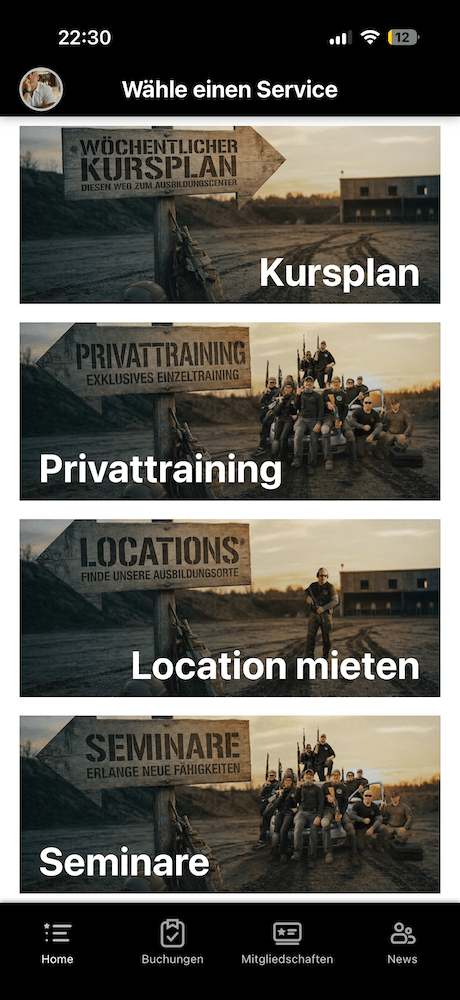
Seminare & Location
Über „Wähle einen Service“ kommst Du auch an Seminartermine und an die Buchung unserer Räume – alles an einer Stelle statt verstreut über Mails.
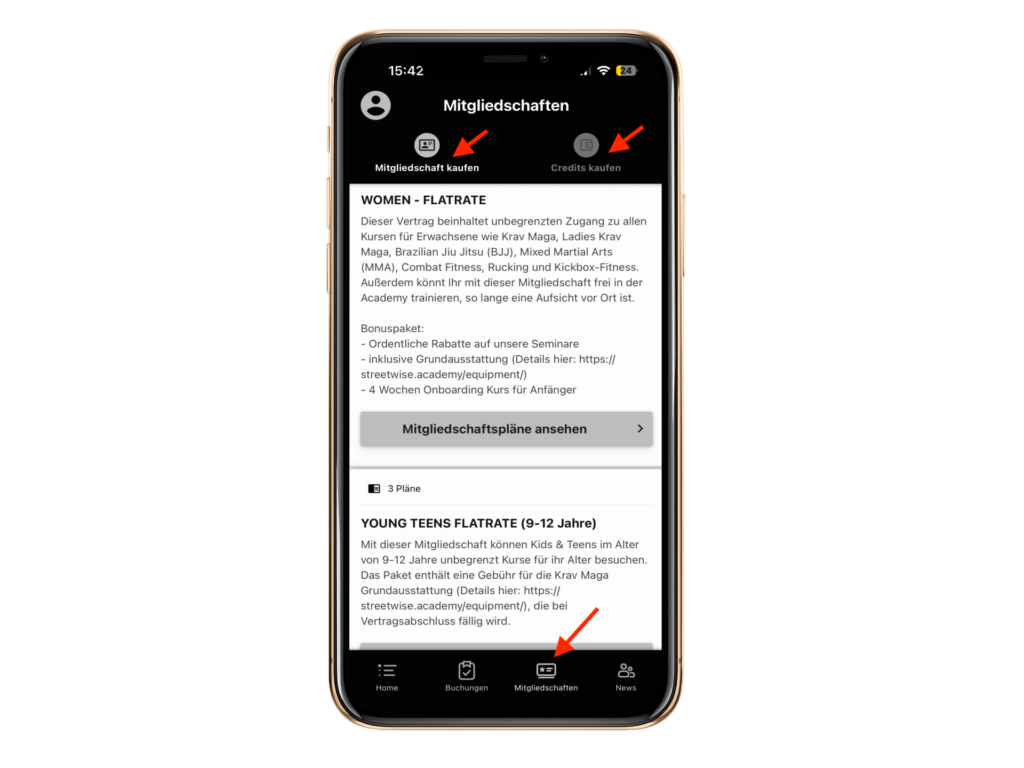
Mitgliedschaft & Tickets
Verträge mit Laufzeit oder Credits ohne Bindung, Zahlungsmethoden ändern, laufende Mitgliedschaft einsehen. Details weiter unten unter Mitgliedschaft.
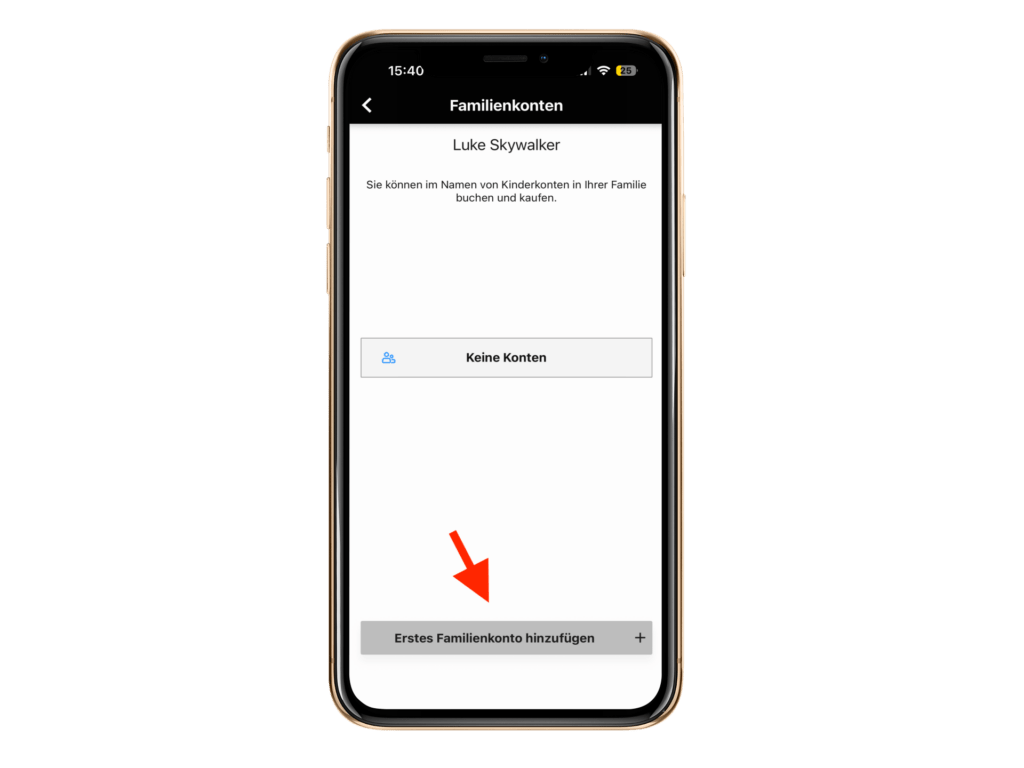
Familienkonten
Konten für Deine Kinder anlegen, deren Kurse buchen und mit einem Tipp zwischen den Konten wechseln. Anleitung unter Familienkonten.
Nichts verpassen
Push und E-Mail bei Kursausfall, geänderten Zeiten oder kurzfristig frei gewordenen Plätzen. Deshalb die Haken in Schritt 6 setzen.
Mitgliedschaft
Vertrag oder Einzeltickets
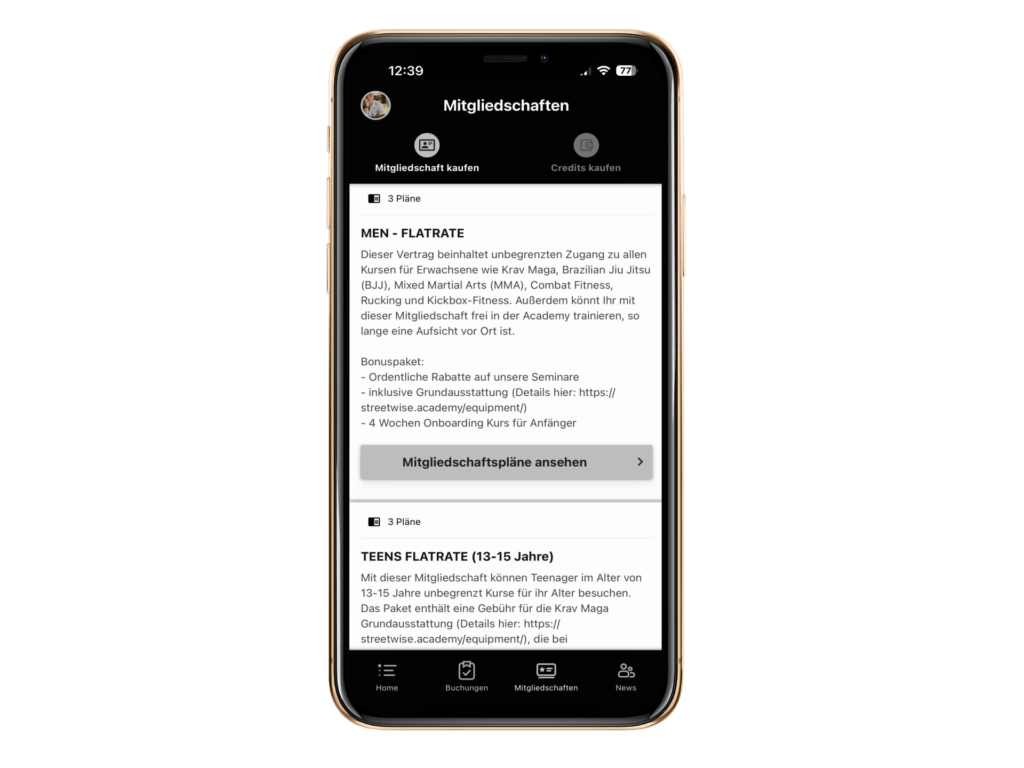
Buchen kannst Du erst, wenn eine Mitgliedschaft oder ein Ticketguthaben hinterlegt ist. Beides findest Du unten in der Menüleiste unter Mitgliedschaften: oben wählst Du zwischen Verträgen mit Laufzeit und Credits ohne Bindung.
Schritt 17
Mitgliedschaften öffnen
Tippe unten in der Menüleiste auf Mitgliedschaften. Oben schaltest Du zwischen Verträgen (mit Laufzeit) und Credits (Einzeltickets, keine Bindung) um.
Schritt 18
Richtigen Typ wählen
Damit Du Zugang zu den passenden Kursen bekommst, muss der Vertragstyp stimmen. Es gibt Verträge für Frauen, Männer, Teens und Young Teens – Young Teens für 9 bis 12 Jahre, Teens für 13 bis 16 Jahre.
Schritt 19
Laufzeit wählen
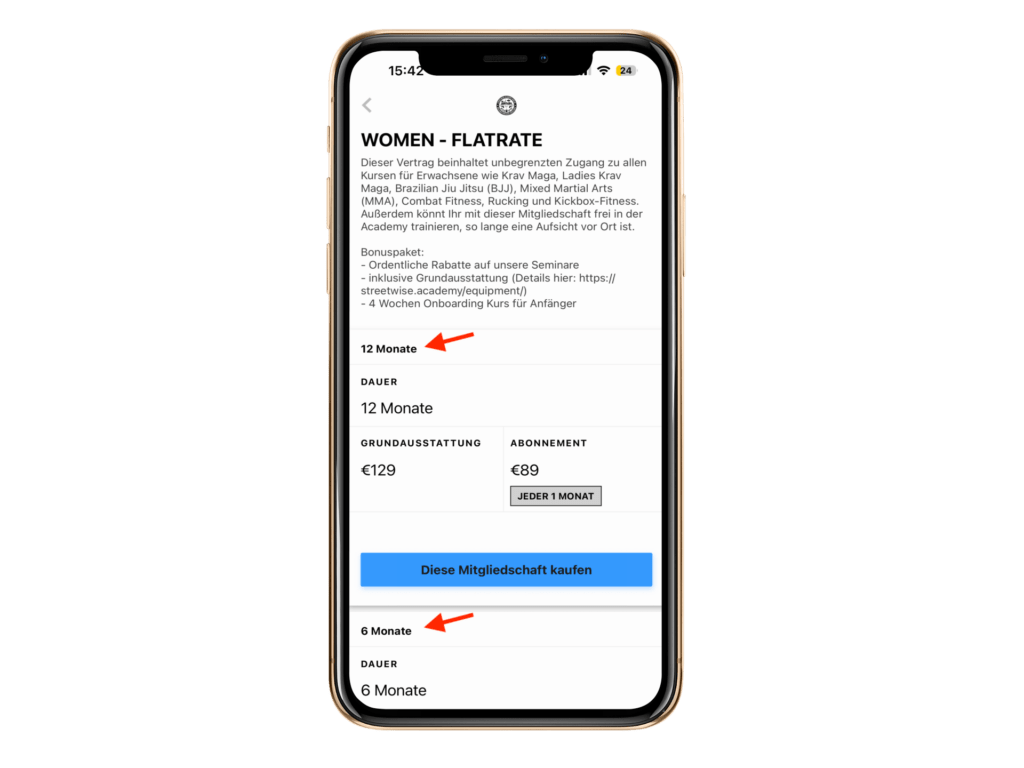
Wähle die Laufzeit – 12 Monate, 6 Monate oder monatlich kündbar – und bestätige mit Diese Mitgliedschaft kaufen. In allen Mitgliedschaften ist ein Starterpaket mit der nötigen Ausrüstung enthalten.
Schritt 20
Kauf abschließen
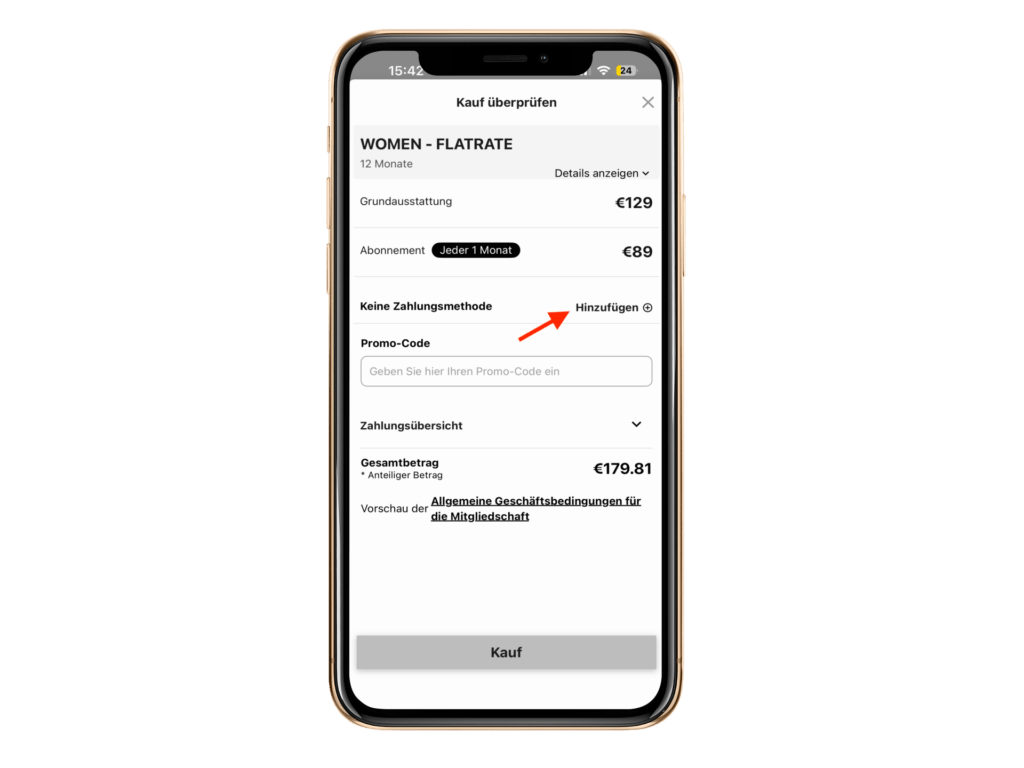
Du siehst die Details noch einmal. Fehlt eine Zahlungsmethode, kannst Du sie hier nachtragen. Mit Kauf ist es geschafft – danach kannst Du sofort buchen.
Behörden und Dienststellen: Angehörige von Polizei, Zoll, Nachrichtendiensten und Justizvollzug schließen ihre Verträge nicht über die App ab, sondern über unsere Hotline. Details auf der Seite Law Enforcement.
Familienkonten
Konten für Kinder und Jugendliche
Minderjährige bekommen kein eigenes Konto, sondern ein Familienkonto unter Deinem. Du kannst beliebig viele davon anlegen, buchst deren Kurse und wechselst mit einem Tipp hin und her. Passend dazu: Teens-Programm und Kids.
Schritt 21
Familienkonto anlegen
Im Profil findest Du den Bereich Familienkonten. Von hier legst Du ein Konto für ein Familienmitglied an – typischerweise für Dein Kind.
Familienkonto Schritt für Schritt anlegen 6 Schritte
Schritt 22
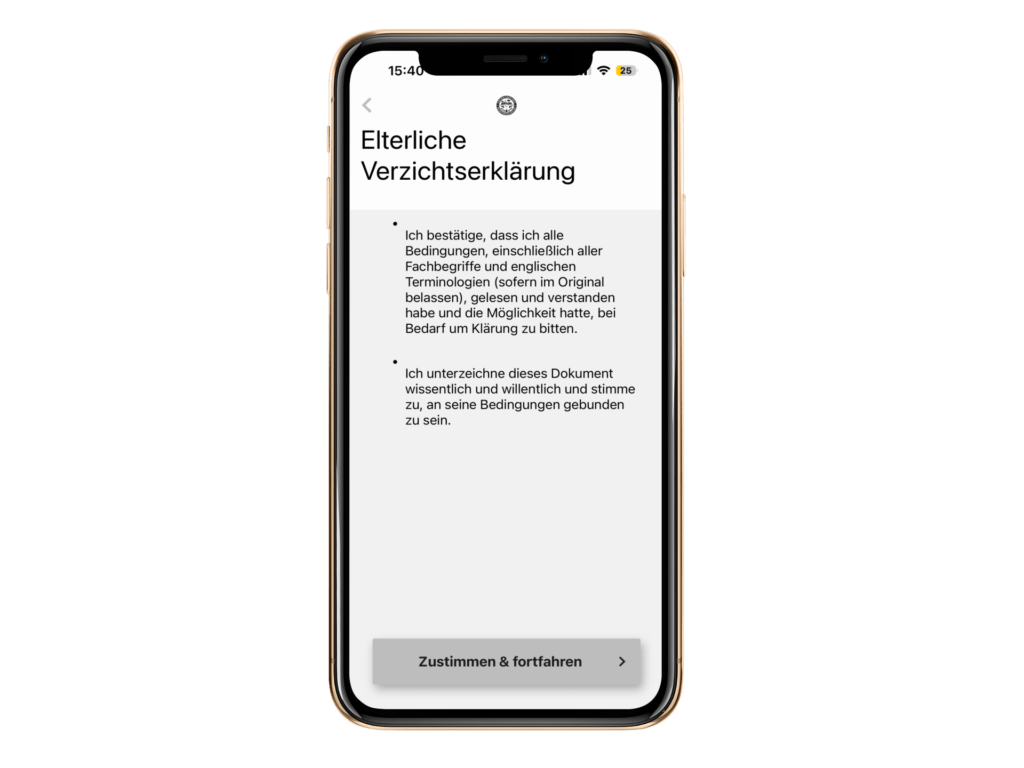
Bedingungen
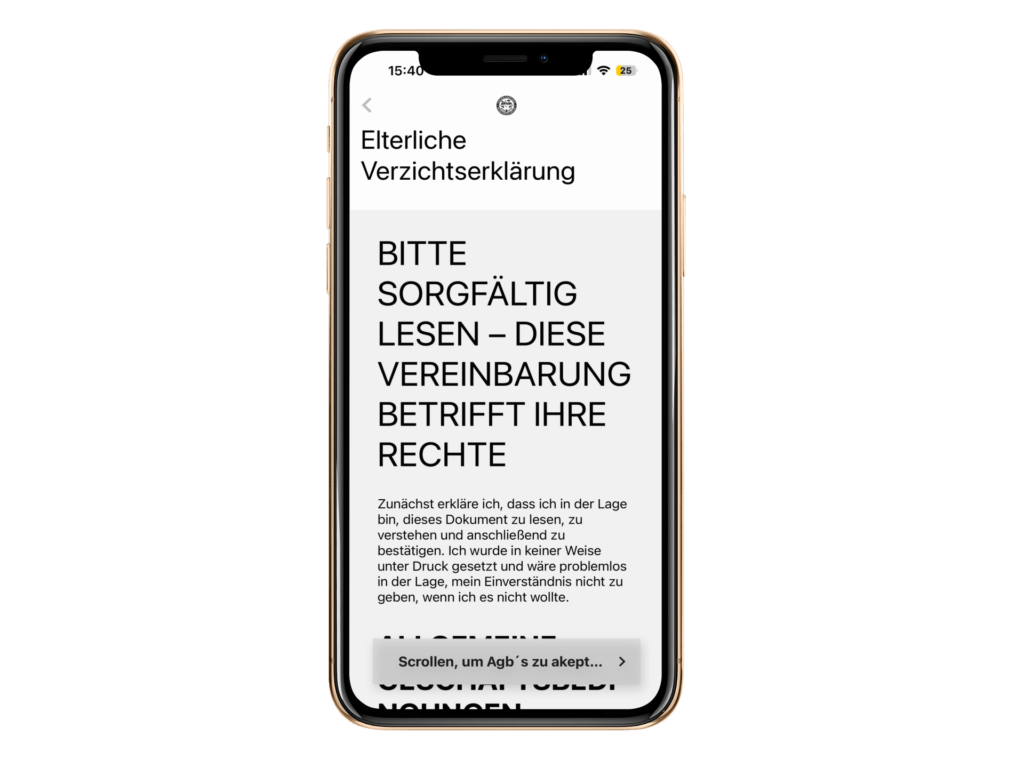
Zuerst werden Dir dieselben Bedingungen noch einmal angezeigt, diesmal für das Familienmitglied.
Schritt 23
Zustimmen
Scrolle im nächsten Fenster bis ganz nach unten und bestätige mit Zustimmen & Fortfahren.
Schritt 24
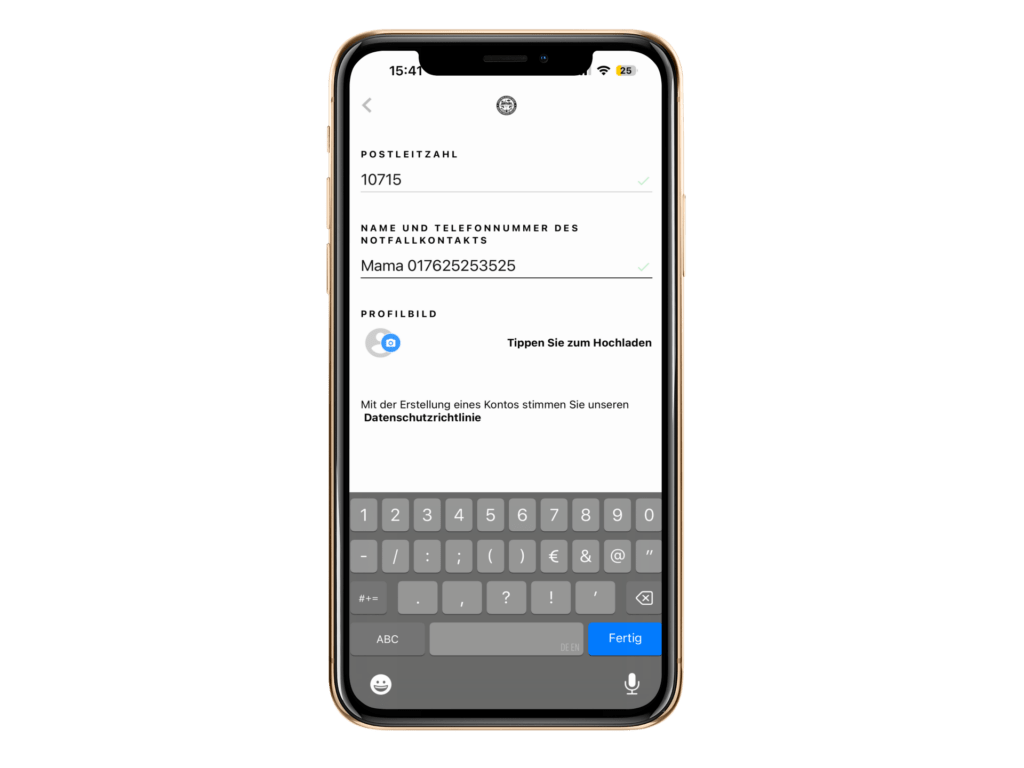
Formular ausfüllen
Fülle das Formular vollständig aus. Lade das Profilbild an dieser Stelle noch nicht hoch – auf manchen Geräten friert der Screen dabei ein. Das Foto ergänzt Du, sobald das Konto steht.
Schritt 25
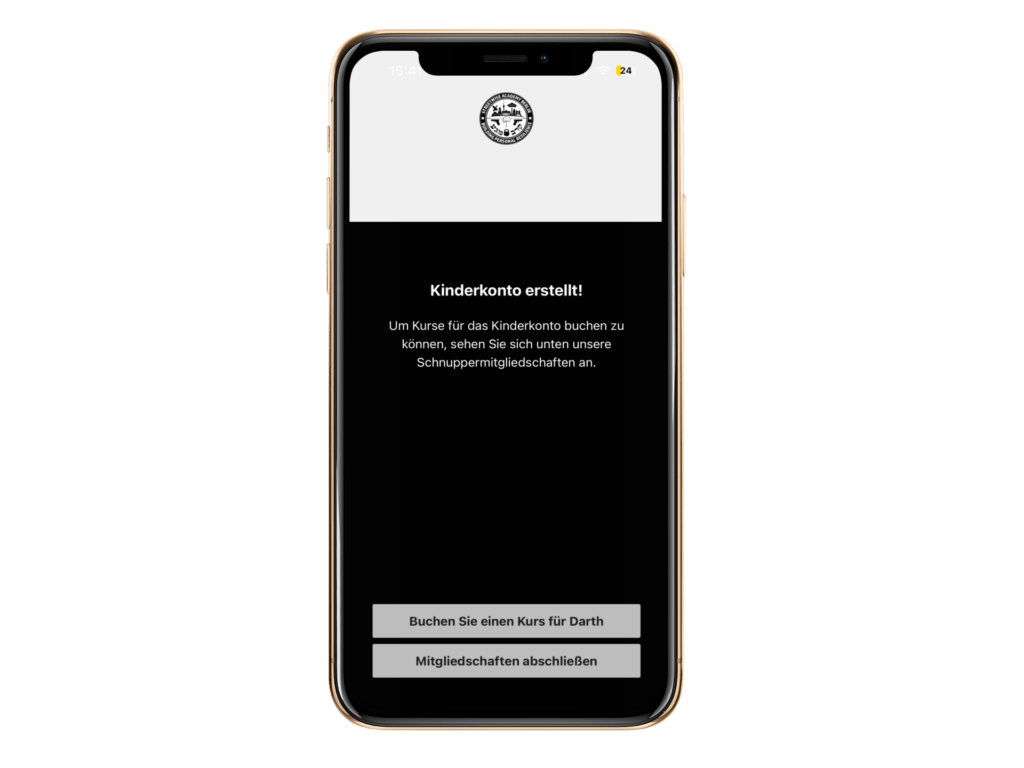
Konto steht
Fertig. Du kannst jetzt Kurse buchen oder Mitgliedschaften abschließen. Hatte Dein Kind vorher schon einen Vertrag in der MySports App, wird der automatisch übertragen – das dauert ein paar Stunden.
Schritt 26
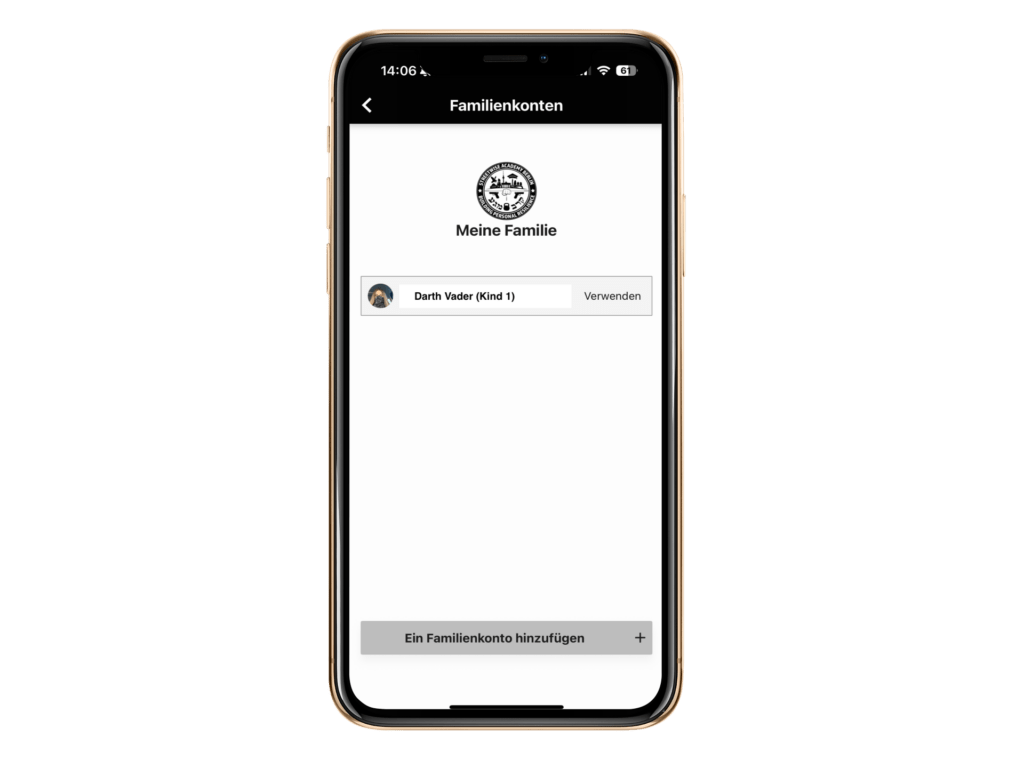
Konto wechseln
Zum Wechseln tippst Du auf dem Startbildschirm oben links auf Dein Profilbild. Unter Familienaccounts stehen alle angelegten Mitglieder.
Schritt 27
Zurück zu Dir
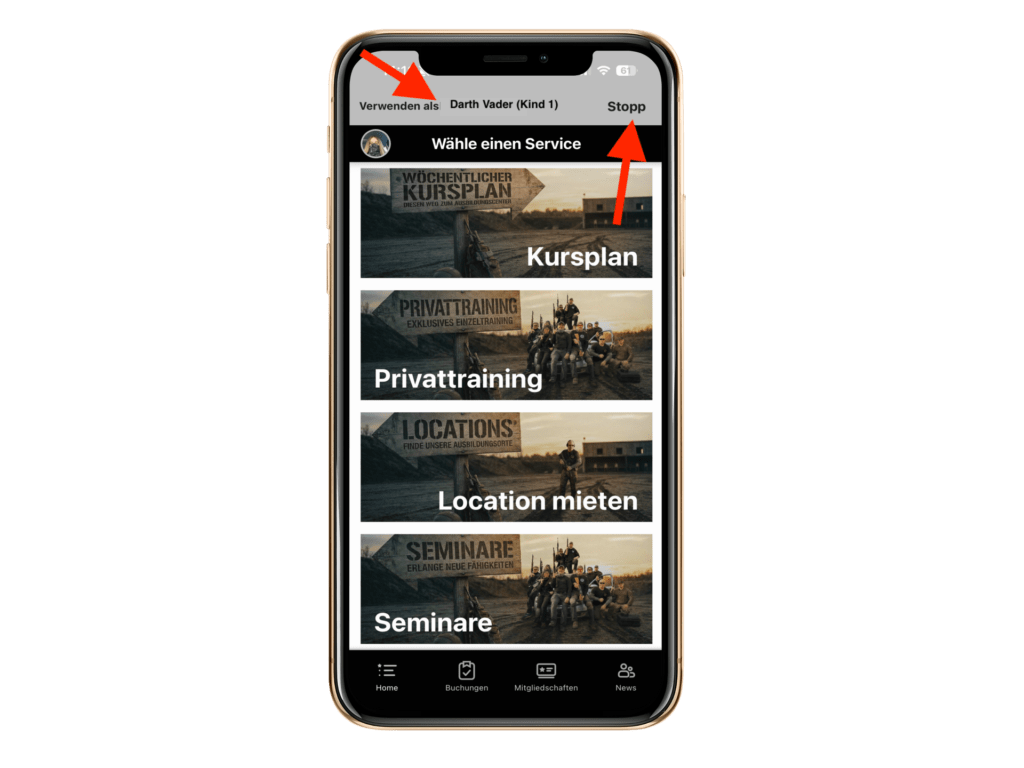
Solange Du als Familienmitglied unterwegs bist, liegt oben ein grauer Balken mit dessen Namen über dem Screen. Mit STOPP oben rechts kommst Du in Dein eigenes Konto zurück.
Hilfe
Wenn etwas klemmt
Das sind die Punkte, an denen es bei anderen schon geklemmt hat. Steht Deine Frage nicht dabei: Schreib uns, wir gehen das mit Dir durch.
Ich finde die App nicht
Suche nach Glofox, auf neueren Geräten ABC Glofox. Lade auf keinen Fall „Glofox Pro“ – das ist die App für Trainer:innen. Direktlinks: App Store · Google Play.
Ich habe schon eine SMS oder E-Mail von Euch bekommen
Dann existiert Dein Konto bereits. Registriere Dich nicht neu, sonst hast Du zwei Konten. Nimm stattdessen „Passwort vergessen“ oben rechts im Anmeldefenster.
Das AGB-Dokument lädt und lädt
Das Signaturdokument braucht manchmal ein paar Sekunden. Nicht mehrfach tippen und die App nicht schließen – sonst musst Du von vorn anfangen.
Der Screen friert beim Profilbild ein
Bekanntes Verhalten auf einigen Betriebssystemen, wenn man beim Anlegen eines Familienkontos sofort ein Foto hochlädt. Konto erst ohne Bild anlegen, Foto danach ergänzen.
Ich komme aus der MySports App
Bestehende Verträge werden automatisch übernommen, auch die Deiner Kinder. Das kann ein paar Stunden dauern – wenn danach etwas fehlt, melde Dich bitte.
Ich bin bei Polizei, Zoll, Nachrichtendienst oder Justizvollzug
Diese Verträge laufen nicht über die App, sondern über unsere Hotline. Schreib uns kurz, dann klären wir das direkt.
Zwei Werkzeuge, zwei Aufgaben
Verwechsle die Studio App nicht mit dem ProgressTracker. Die Studio App ist für Organisation: Kurse buchen, bezahlen, Mitgliedschaft verwalten. Der ProgressTracker ist eine Web-App: Er läuft im Browser auf Handy, Tablet und Rechner und zeigt Deinen Ausbildungsstand: Welche Einheit gerade dran war, wie viele Besuche Dir bis zur nächsten Levelprüfung fehlen und wo Du in Deinem Level stehst.
Noch Fragen? Wir richten die App auch gemeinsam ein
Wenn irgendetwas hängt: Komm zehn Minuten früher ins Training, dann machen wir das zusammen am Tresen. Oder schreib uns vorher.
Overview
What the Studio App is - and what it is not
Our Studio App is where everything organisational happens: you see the full class schedule in real time, book classes and private training, take out your membership, store your payment details and get a message whenever something changes. It works without the app too - but then you are always one step behind the information.
The software behind it is called Glofox. So in the App Store and on Google Play you search for "Glofox" and then select our studio inside it. On some devices the app is now called ABC Glofox - it is the same app. Stay away from "Glofox Pro": that is the trainers' app and of no use to you.
Setting it up takes about ten minutes, once, because you also sign the terms and the liability waiver digitally. After that, booking is two taps. This page walks you through it step by step, with one screenshot per step.
Price
free
Platform
iOS & Android
Setup
approx. 10 minutes
For children
family accounts available
Step 1
Download the app and pick our studio
Two quick moves. All that matters is that you get the right app and then select our studio - otherwise you are looking at somebody else's schedule.
Step 1
Download the app
Open the App Store (iPhone) or Google Play (Android) and search for Glofox - not for "Glofox Pro", which is the trainers' app. On newer devices it runs under ABC Glofox. Or simply use one of the two buttons above.
Step 2
Search for Streetwise Academy
Launch the app and search for Streetwise Academy. Select the entry. From then on you only see our classes, dates and prices.
Step 2
Register and set up
This is the longest part, but you do it exactly once. If we have already created an account for you - you will have had a text or an email from us - do not register again; use "Forgot password" to set your password instead.
Step 3
Register
New here? Tap SIGN UP at the bottom right and follow the instructions. If we already created an account for you, use "Forgot password" at the top right instead.
Step 4
Sign-in details
Your account is identified by your email address. Choose a secure password: at least eight characters, including an upper and a lower case letter, a digit and a special character.
Step 5
Phone & date of birth
Enter your mobile number and your date of birth. We need the date of birth because some classes are tied to age groups.
Step 6
Notifications
Tick both boxes. It is the only way you hear about schedule changes, cancelled classes and reminders for the sessions you booked.
Signing the terms and the liability waiver 5 steps · once
Step 7
Open the document
Now you sign the terms and the liability waiver digitally. The document sometimes takes a few seconds to load - do not tap repeatedly. Scroll all the way down and tap START SIGNING.
Step 8
Signature field
Tap the area marked in red SIGNATURE. A new screen opens.
Step 9
Type or draw
At the top left, choose whether to sign with your finger (DRAW) or simply type your name. If the typed name is enough for you, confirm straight away with ACCEPT & SIGN.
Step 10
Signing by hand
With DRAW you sign with your finger on the screen and confirm at the bottom right with ACCEPT & SIGN.
Step 11
Finishing up
You see the signed document. Tap FINISHto complete the process.
Step 12
Account is ready
Done, your account exists. Now you decide whether to take out a membership and book classes - or first set up a family account for a family member under 18.
Completing your profile and adding a payment method 4 steps · recommended
Step 13
Open your profile
Tap the round icon at the top left - at first still without a photo - to complete your details.
Step 14
Profile picture
You now see your account. At the top right you set a profile picture. It helps the instructors put a name to your face in class.
Step 15
Address & emergency contact
Further down you enter your address and an emergency contact. We really do need the emergency contact - please fill it in.
Step 16
Payment method
Store one or more payment methods: credit card, direct debit and, shortly, Apple Pay and Google Pay.
Step 3
Getting going - what you do in the app
From here on it gets easy. This is everyday life with the app, and for that you no longer need a manual.
Schedule & booking
The full weekly schedule with times, instructor and free spots. One tap on the class, one tap on book - done. Cancelling is just as quick.
Private training
You book private sessions directly with the individual instructor, showing the times they actually have free. No back and forth by message.
Seminars & venue
Under "Choose a service" you also reach seminar dates and the booking of our rooms - all in one place instead of scattered across emails.
Membership & tickets
Contracts with a term or credits without commitment, changing payment methods, checking your running membership. Details further down under Membership.
Family accounts
Create accounts for your children, book their classes and switch between accounts with one tap. Instructions under Family accounts.
Miss nothing
Push and email when a class is cancelled, times change or a spot frees up at short notice. That is why you tick the boxes in step 6.
Membership
Contract or single tickets
You can only book once a membership or a ticket balance is in place. You find both in the bottom menu bar under Memberships: at the top you choose between contracts with a term and credits without commitment.
Step 17
Open Memberships
Tap Membershipsin the bottom menu bar. At the top you switch between Contracts (with a term) and Credits (single tickets, no commitment).
Step 18
Choose the right type
To get access to the right classes, the contract type has to match. There are contracts for women, men, teens and young teens - young teens for ages 9 to 12, teens for ages 13 to 16.
Step 19
Choose the term
Choose the term - 12 months, 6 months or cancellable monthly - and confirm with Buy this membership. Every membership includes a starter pack with the equipment you need.
Step 20
Complete the purchase
You see the details once more. If a payment method is missing, you can add it here. With Buy you are done - after that you can book straight away.
Public authorities and services: Members of the police, customs, intelligence services and the prison service do not sign their contracts through the app but through our hotline. Details on the page Law Enforcement.
Family accounts
Accounts for children and teenagers
Under-18s do not get an account of their own but a family account under yours. You can create as many as you like, book their classes and switch back and forth with one tap. Related: Teens programme and Kids.
Step 21
Create a family account
In your profile you find the Family accountssection. From here you create an account for a family member - typically for your child.
Creating a family account step by step 6 steps
Step 22
Terms
First you are shown the same terms once more, this time for the family member.
Step 23
Agree
In the next window scroll all the way down and confirm with Agree & continue.
Step 24
Fill in the form
Fill in the form completely. Do not upload the profile picture at this point - on some devices the screen freezes when you do. Add the photo once the account exists.
Step 25
Account is ready
Done. You can now book classes or take out memberships. If your child already had a contract in the MySports app, it is transferred automatically - that takes a few hours.
Step 26
Switch accounts
To switch, tap your profile picture at the top left of the home screen. Under Family accounts you find everyone you have created.
Step 27
Back to yourself
While you are acting as a family member, a grey bar with their name sits across the top of the screen. With STOP at the top right you return to your own account.
Help
When something gets stuck
These are the points where others have got stuck before. If your question is not among them: write to us and we will go through it with you.
I cannot find the app
Search for Glofox, on newer devices ABC Glofox. Whatever you do, do not download "Glofox Pro" - that is the app for instructors. Direct links: App Store · Google Play.
I already got a text or an email from you
Then your account already exists. Do not register again or you will end up with two accounts. Use "Forgot password" at the top right of the sign-in window instead.
The terms document keeps loading
The signature document sometimes takes a few seconds. Do not tap repeatedly and do not close the app - otherwise you have to start over.
The screen freezes on the profile picture
Known behaviour on some operating systems when you upload a photo straight away while creating a family account. Create the account without a picture first and add the photo afterwards.
I am coming from the MySports app
Existing contracts are carried over automatically, your children's as well. It can take a few hours - if something is missing afterwards, please get in touch.
I work for the police, customs, an intelligence service or the prison service
These contracts do not run through the app but through our hotline. Drop us a line and we will sort it out directly.
Two tools, two jobs
Do not confuse the Studio App with the ProgressTracker. The Studio App is for organisation: booking classes, paying, managing your membership. The ProgressTracker is a web app: it runs in the browser on phone, tablet and computer and shows where you stand in your training - which unit was covered, how many visits you still need before your next level test and how far you are through your level.
Still stuck? We will set the app up with you
If anything is not working: come to training ten minutes early and we will do it together at the desk. Or write to us beforehand.